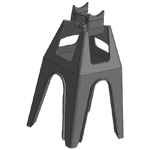
At a glance, the process of tying rebar may look easy. However, the reality is that is it quite a lengthy and complicated process. While it isn’t exactly rocket science, there are still a lot of things one needs to take into consideration when tying rebar. Do it improperly, and you risk endangering the entire integrity of a structure. In this short guide, we highlight the dos and don’ts of tying rebar.

Do your homework on what sizes, configuration, and placement of rebar will be required, as well as what type of chairs would be best for the job. Both concrete and plastic chairs have their pros and cons, and it will depend on your situation and budget in deciding which one to use. Additionally, you will have to consider how you will tie your rebar. Annealed steel wires are cheaper and more versatile while bag tie spinners are easier to work with but can cost more.
Everything from rebar placements to the use of chairs in rebar support needs to be precise. Therefore, it is important to share your building plans in detail with rebar and rebar support suppliers. This will allow them to supply you with the right rebar sizes and rebar support, and in the right amount.
Placing and keeping the bars in the right position is essential to achieving the desired strength of the completed concrete structure. To aid in this regard, use the layout bars as your reference. Make sure to mark them properly so you can differentiate them easily.
For ordinary construction projects where the force of the concrete on rebar during its placement would be minimal, a simple snap tie would suffice in tying the rebar together. However, for other cases where the force of the concrete placement risks displacing the rebar, more advanced methods of ties are needed. The two most common types of advance rebar tie methods are Figure 8 and the Saddle.
For holding perpendicular bars firmly together and reducing the risk of racking, figure 8 is used. Meanwhile, for tying rebar for walls or other vertical constructions, the Saddle tie is used. In real-world applications, a combination of both along with other tie methods will be used depending on the nature and requirements of the rebar construction.
Chairs are extremely important in helping keep the rebar in their correct positions during construction. Once the mat has been established, the chairs will hold the rebar in place as the concrete covers it completely.
As the concrete is poured over the rebar, shifting can occur, putting the rebar out of alignment. To remedy this, you can support the rebar with a handled tool such as a shovel wedge to give sufficient leverage to allow it to hold its position. Alternatively, you may alter the direction of flowing concrete, so the force is applied in the opposite direction.
Unless you want to risk serious injuries, always make sure to put caps on exposed rebar. The cut ends of rebar are extremely sharp, and in the past, some construction works have even been maimed or killed by falling over projecting rebar dowels. As required by the Occupational Safety and Health Administration (OSHA), special rods cap made with high resistance plastic should be placed on any exposed rebar cut ends.
Rebar support has to be placed at just the right distance between them. If they are too far apart, the rebar will bend in the middle due to its weight and thus, result in more headaches for you. Another rebar support problem that may arise is that the rebar chairs, especially plastic ones, can also break due to the excessive weight put on them. Cracks can also form on concrete blocks, compromising the robustness of the structure being built.
As mentioned before, different types of chairs have their own advantages and disadvantages. If the rebar structure is not too weighty, and the end structure won’t be subject to too much abuse from the elements, plastic chairs would be a decent, affordable option. Meanwhile, concrete blocks augment the strength and durability of the whole structure, but it would be an overkill to use them in a small scale, not too demanding, construction project.
To achieve proper adhesion, the welding process must be able to heat the surface of the metal rebar to the melting point, which is difficult to do on most rebar types. Only certain types of rebar with a “W” stamped on it can be welded. Even then, you must be a qualified welder and have a procedure planned to weld them.
To achieve the optimal results and avoid running into any problems, consider applying the best practices when it comes to tying rebar and rebar construction. If you found the information in this article useful, do consider sharing it with your colleagues and friends.

